Add new customers and customer attributes
Dashboard #
- Use the Customer List as a dashboard to:
- Go to any page of any customer’s account:
- Ordering
- Finance
- Item Catalog
- Calendar
- Addresses
- Contacts
- Settings
- Audit Trail
- CRM Events
- Go to any page of any customer’s account:
- Add new customers
- Using the interface
- Import CSV
- You may also import customers from QuickBooks and Xero in their respective Dashboard
- Add Customer Attributes: use to filter reports in Streamline
- Import Customer SKUs
- Toggle a customer status between live/not live/on hold
- Switch system emails on and off to a specific customer: click the mail icon
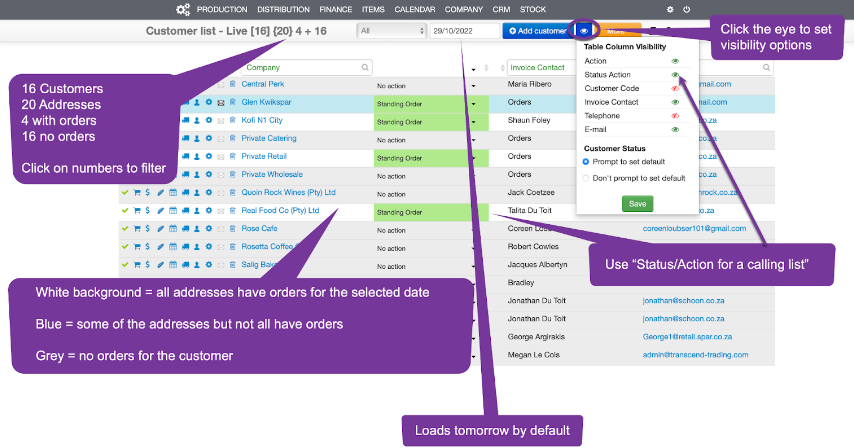
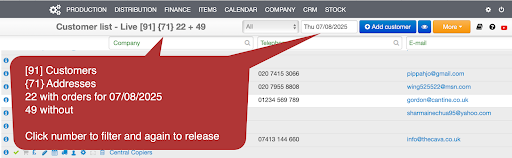
Viewing and Filtering Customers with Orders #
- View at a glance customers with and without orders for the date selected, by default, tomorrow.
- Filter the list by Sales Rep
- Filter by column or order status using the summary numbers at the top.
- Total Number of Customers
- Total Number of Addresses – a customer may have multiple addresses
- Addresses with Orders – total number of addresses with orders for the selected date
- Addresses without Orders – total number of addresses without orders for the selected date
- Color coded rows show order status:
- White: All addresses have orders
- Blue: Some addresses have orders
- Grey: No orders placed
- Red: Orders cancelled
- Burgundy: Account on hold
Customize the interface #
- Click on the blue eye to to show/hide columns
- Use the Status/Action column to keep daily notes when calling customers to take orders .
- Sort and filter the list by status
- Sort call backs chronologically


